"What is my dancer wearing?"
The costumes are ordered, the kids are excited, and the classes are learning their parts. Everyone is on pins and needles. "What do our costumes look like???"
I WAS going to make you wait until the costumes arrive, but I SUPPOSE I could take pity and give you a sneak peak. ;)
The costumes are listed by part for the Ballet 3's and down. Ballet 4's up will have to wait a bit longer (sorry kids!) If you don't see your dancer's part listed, please leave me a note in the comments section and I'll get it posted as soon as I can. :)
Daisies:
If you show this photo to your dancer, please make sure to tell her that we will NOT be using the big flower that's pictured. We have flower headpieces that are loaned to the studio and we will be using those. You won't be able to keep the headpieces but you WILL get to keep the big flower in this photo! :)
Roses:
Again, if you show this to your little one, please let her know that we won't be using the little arm puffs. The girls will be borrowing a pretty rose head piece from the studio. You won't be able to keep the head piece, but we'll be sure to send the arm puffs home. I'm sure the girls will want them for playing dress up later. :)
Dragonflies
We probably won't be using the scarf, but the girls will have some pretty neat wings to wear! I'm not sure yet if these will be on loan from the studio, or if we'll be able to send them home. We'll let you know as soon as we can. :) We'll be sure to send the scarf home if we don't use it.
Butterflies
How cute are these? :)
Cats Sorry! No pictures yet. They will have a long sleeve white leotard and a white handkerchief skirt. The rest of their pieces will probably need to be made in our sewing room...so you get to be surprised.
Sleep Fairies
The sleep fairies will be wearing this leotard in the blue color, along with this skirt:
They'll also be wearing a pair of pretty wings to match. I'm not sure yet if these will be on loan from the studio, or if we'll be able to send them home. We'll let you know as soon as we can. :)
Trees
We will only be using the green and blue colors of this costume. The kids will also have "branch" props to dance with and some tree-style head pieces. The props and headpieces are on loan from the studio, the costumes are yours to keep. :)
Wood Fairies
We've ordered this one in the sage green version. The woodland fairies will also be provided with a set of wings and a headpiece. I'm not sure yet if these will be on loan from the studio, or if we'll be able to send them home. We'll let you know as soon as we can. :)
The Children Who Live in the Shoe
We've ordered two of each color, but which color you get will be a surprise. The girls are matched in their lines, two by two. :) Very cute. If there's time we'd like to add an apron and handkerchief to these. (Anyone want to do some very simple sewing?)
Young Aurora's Friends
We've split the class, 1/2 in pink and 1/2 in lavender, but which color you get will be a surprise. A head piece will be provided on loan from the studio.
Everyone else gets to wait and see, but I promise the costumes for the older dancers are beautiful. I'll try to get photos up as we get the first done of each group, so check back from time to time!
If you have any questions, swing by the costume room or leave us a note in the office. Teri or I will be glad to get back to you as soon as we can.
Weekend Link Love

The costumes are rolling along in the sewing room. The kids are all measured. The costumes are ordered. With lots of progress being made, a break is in order.
So grab your coffee, and settle in for some costumey link fun!
EYE CANDY Rossetti Couture offers up an AMAZING selection of custom made costumes, bridal gowns, and formal wear. This woman is incredibly talented, and I want to be her when I grow up. Be sure to click through all of the galleries and look at the close ups. Trust me. It's worth it. Time Life Magazine has made it's archive of photographs available on Google. There are some truly incredible, historic photos tucked away in this collection that are not to be missed.
SEWING RESOURCES Cheep Trims offers a great selection of appliques, trims and sewing notions at very good prices. They have a HUGE number of beaded and sequined yokes to choose to from, and lots of pretty ribbons and lace. Fun stuff!Tutu.com is a good resource for absolutely EVERYTHING you could possibly need by way of tutu supplies. Patterns, books, fabric, hooks, you name it, they have it. The most impressive things they offer, by far, are their tutu seminars and work shops. If you (or your studio) have the funds available, this is the way to learn!
JUST FOR FUN Ballet Talk For Dancers is not JUST for dancers. There are boards for parents of dancers, a pro shop (for costumers, tech crew, etc), adult dancers, teens, and more. It's a WEALTH of information, well organized, and on a well moderated board.
They just don't sew them like this anymore....
I am interrupting my project because I ran across these in my photo files today and they made me *gasp* all over again.
A few years ago, when I started at our ballet school, we did a major reorganization of the costume room. We went through each box, tossed some things beyond saving, ooh'd and aww'd (and EWWWW'D) over some of the things we found.....and then we found this:
*jawdrop*
I was speechless (not a normal state of being for me!) This is one of those costumes that makes your imagination just go insane. WHO wore it? WHY? WHEN?!? It's very clearly VERY old.
The HOURS of hand sewing that must have gone into this costume are staggering. This criss-cross of sequins goes all the way around the skirt. The bodice is covered in sequin trim, placed to flatter a very small dancer.
It even covers the panty!
I don't know a LOT about this costume. I was told that it was part of an auction, and that it was designed by one of the big movie costumers.
The dress form I had this on is a little girl size 6, so I will have to get a picture of this one on a body for you all. It's really just too beautiful to be believed. Eventually, I would love to take a pattern from this piece and recreate it so it can be used again. This one is just too fragile.
I would love to see your show and tells! What have you seen that left you saying "WOW"?
The Refurbishment of the Pitiful Ms. Green
Our studio owns roughly forty-five tutus. Forty-five pretty ruffled skirts, all hung in a pretty ruffle row, of which ONE is suitable for a Sleepy Beauty Fairy.
We do, however have four of these sad ladies.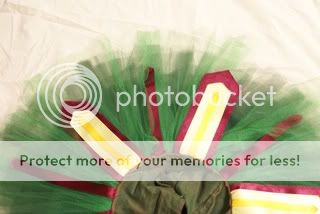
Now, to be perfectly honest, this skirt is a mess. It's been spray dyed green, the net has gone soft, it was hooped with boning (ugh), and it's generally wrinkled and rumpled. So the first job is a little bit of demolition.
Ms. Green Goes To The Surgeon The basque on this skirt is just tired. They take a lot of abuse and this girl has had one alteration too many. Off it comes. I've left myself a 2 inch seam allowance to attach a new piece, and just cut the rest off.
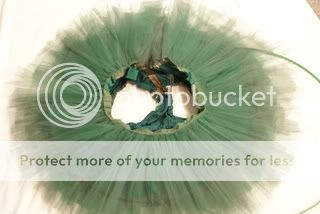
Next, remove the embellishments and flip the tutu over. By removing all of the tacks that hold the ruffles together, I've opened the skirt up so that I can remove the hoop and access each row individually. Eventually I will need to straighten, steam, and starch each row, but that's for later.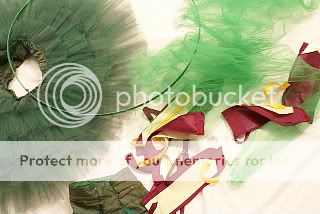 TUTU CARNAGE! ACK!
Ms. Green Receives Life Support
Now I'm going to cut some new layers of frill (ruffles) for the Pitiful Ms. Green. These will be added in between the original layers, to give our skirt added fullness and help support the tired older net.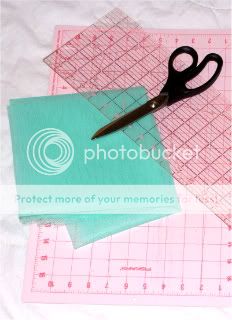
If you decide to give this a try, you will need:
* Approximately 5 yards of good Tutu Net
* A good pair of scissors
* A cutting mat of some sort, preferably marked with measurements
* Something to hold down the net while you're cutting. I use a rotary ruler, but a book or magazine works just as well.
For anyone using a rotary mat and ruler, the temptation is there to use your rotary cutter too. Fight it. Seriously. I've found net almost impossible to cut that way and it completely destroys the blade.
The net I'm using is not the nylon craft net you get at your local fabric store. Spend the extra 25¢ per yard to get the good stuff. You can find it at tutu.com in lots of colors. I started by opening the skirt to the place where I will be stitching in the new ruffles, and measuring the layers above and below. In this case the rows were 12 and 10 inches. My new row will be 11, so that it fits nicely between them.
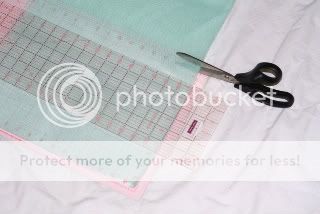
For each new row of ruffles, I cut five widths of net. Five strips, 11 inches wide. Five strips 8 inches wide. Etc etc.
You can save yourself a major headache by rolling each set of five as you go so your lengths don't get mixed up. I learned this the hard way. 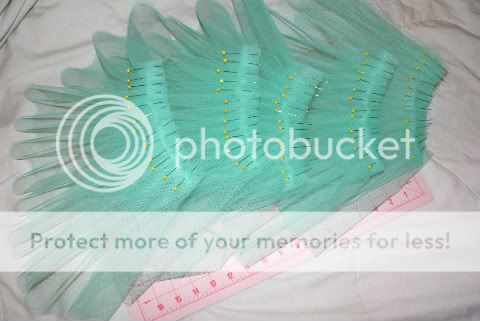
Working with one set of strips at a time, it's time to gather or pleat each row. If you're feeling brave and want to make hand pleats, there's a great tutorial HERE ON YOUTUBE. If you prefer the less uniform look, you can gather each section with two rows of basting stitches, just like you would any other ruffle. Each section should gather or pleat down to around 6-8 inches.
Run a quick stay stitch across each gathered edge to keep your fabric in place.
Next Up: Ms. Green Gets Stitches
Auditioning Do's and Don'ts!
 It's Nutcracker Season again!
Most of the audition advice floating around on the internet applies to older dancers auditioning for advanced parts or ballet companies.
The audition process can seem a bit intimidating for parents and dance kids who are trying out for the very first time. Don't worry! It's not as scary as the movies. I promise.
Here are some Do's and Don't's to help you through your dancers audition.
DO:
- Come prepared. Your class uniform is fine, but everything should be clean, neat, and in good repair (No holes!!) Hair should be in a stage-ready bun with no whispies or "accessories." Leave the sparkly bun cover at home. Remove any jewelry before going in.
- Arrive early. Give yourself plenty of time to fill out paperwork, have measurements taken, and get comfortable with the process.
- Encourage your dancer to warm up and stretch if they are old enough to do so.
- Remind your dancer to curtsy and thank the instructors.
- Bring your calendar! Many studios will have a tentative rehearsal schedule in place and will want to know about any conflicts or family trips right away.

- Don't load on the stage makeup. If your dancer is old enough to wear makeup on a day to day basis, then light and natural looking make-up is fine. The younger crowd does not need makeup unless instructed otherwise.
- Don't try to watch the audition. It's not allowed. Period.
- Dont talk and chatter in the space outside the audition room. If you can hear their music, they can hear your voice.
- Don't rush out the door the second they're dismissed. Hang around a little bit. Many places will have the cast assigned right away, or have questions for you. Be sure your REALLY done before you go home.
- Please, don't ever tell your child that you're sorry they didn't get a bigger part. They are ALL big parts. The so called "small" parts are the ones that tell the story, and there wouldn't be a ballet without them.

How to Make: A tiny rolled hem without a serger!
Rolled hems are infinitely useful in costumes. They're light, flexible and quick. They're also a pain in the behind if you don't own a serger or have a serger that requires everything short of standing on your head to change functions.
So lets say that you only have a sewing machine available, or you don't like standing on your head. What's a costumer to do?
Today I'll show you a "quick and dirty" method for creating a rolled hem using the zig-zag stitch on your sewing machine!
Here We Go!
We'll start by setting your sewing machine to the widest zig-zag stitch available, and crank the wheel once around to be sure your needle isn't going to hit the presser foot.
Your stitch length will be very short. A length of 1 or 1.5 gives a nice, lightweight hem. Every machine is different, so once you try this you'll need to play with this setting to find a length that you're happy with.
Rotate your needle into the down position on the RIGHT HAND side of the zig-zag.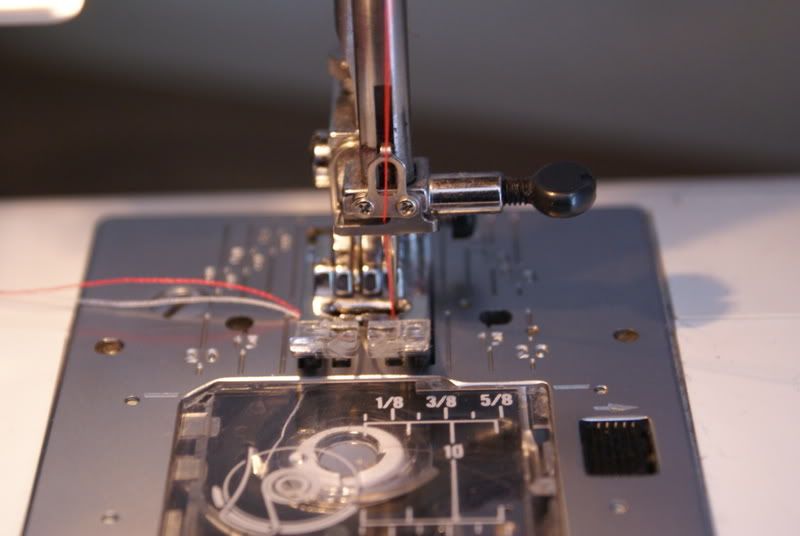
Place your fabric on a firm surface, and fold the raw edge in roughly 1/8 of an inch. Crease lightly being careful not to stretch the fabric. If you're more disciplined than I am, you can pre-fold and press these edges...but again, this is the quick and dirty version. 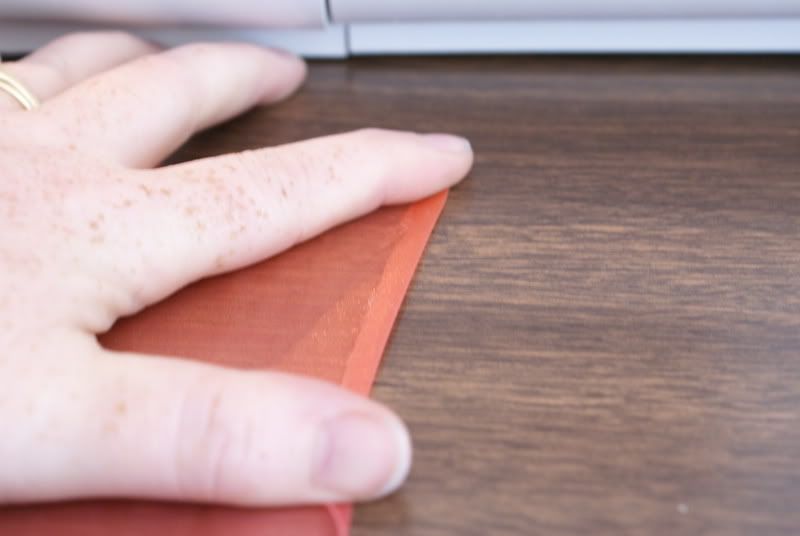
Place the folded edge under the presser foot, with the crease pushed up against the side of the needle, and drop your presser foot. It's best to start on a wide section of fabric. Starting on a narrow little tip will cause your fabric to push down into the needle plate. 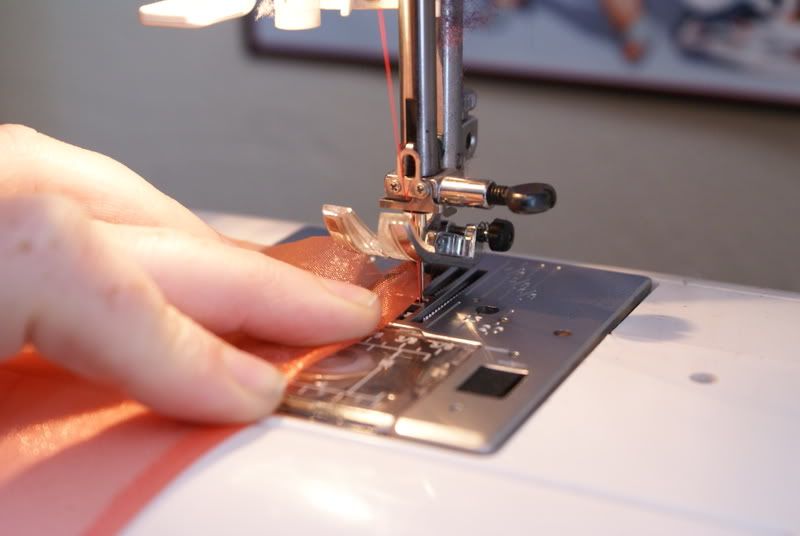
Be sure to hold your top and bottom threads out the back as you take your first few stitches. This saves your thread from becoming 'nested' under the needle plate, or making an unsightly tangle in your pretty hem.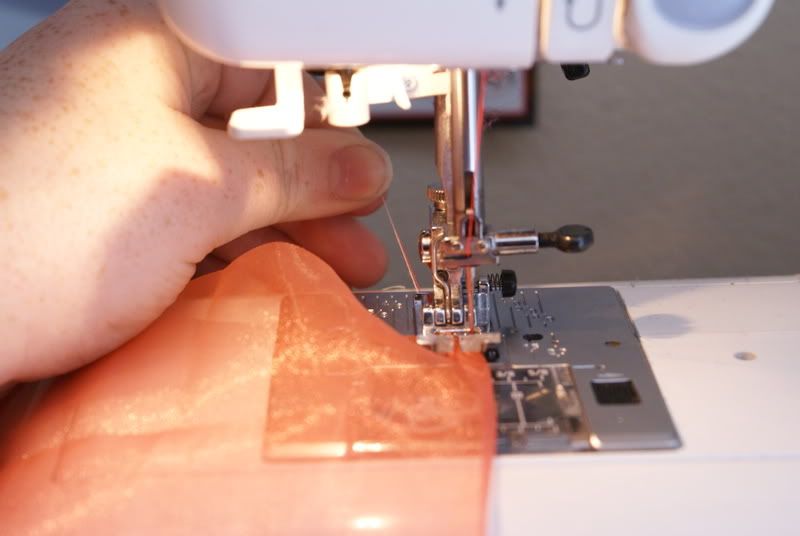
Start slowly! As you sew, the needle should fall into the fabric on the left side of the stitch and JUST off of the fabric on the right hand side of the stitch. 
If you're in a hurry and didn't press your fold in place (or lazy, like me) you'll need to keep folding the edge as it comes under your foot. 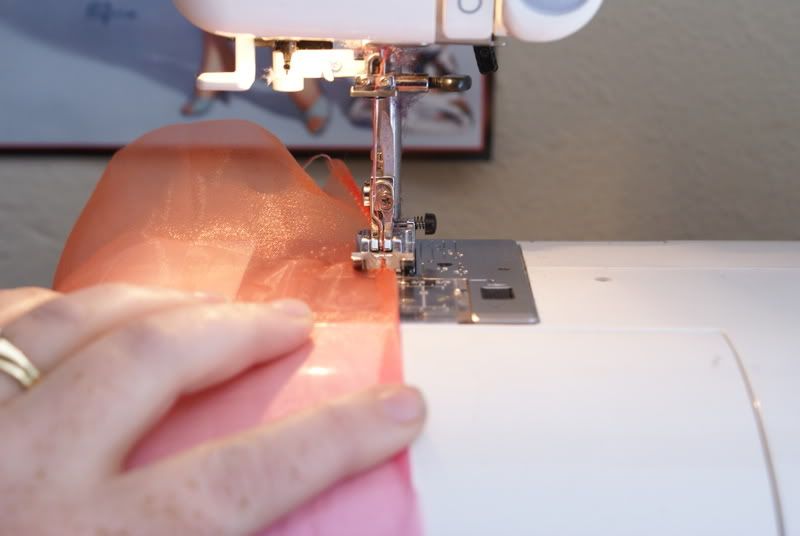
Your finished product is a tidy rolled hem with a lovely uniform edge.
The left side of this photo shows a stitch length of 1.5 and the right side is a length of 1. 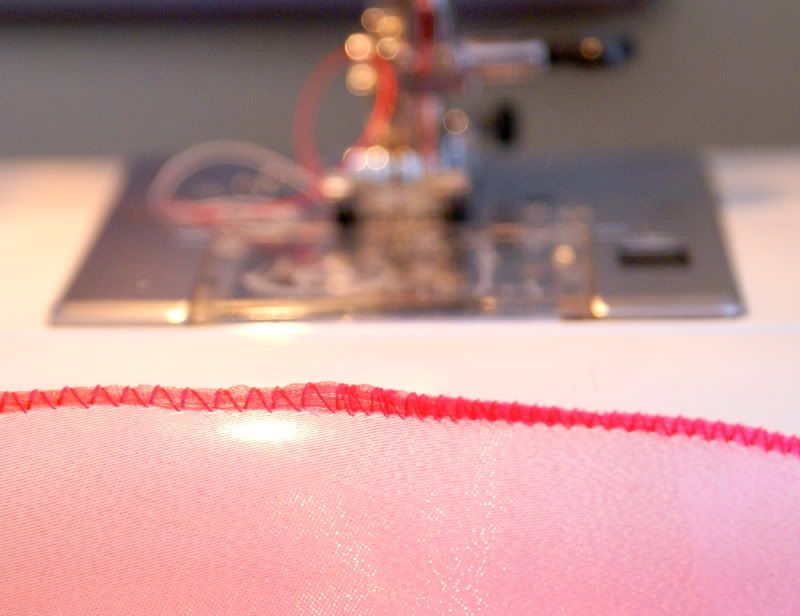
A Few Tips
~* Stretching or pulling gently on your fabric as you stitch will produce a gentle wave in your hem.
~* Stretching or pulling HARD on a knit fabric will produce a frilly "lettuce" edge. A very short stitch length is required, and you need to steam the hem when you're finished to make it contract and ruffle.
~* If you are working on the bias (diagonal) and you DON'T want a wavy edge, pre-fold and press your fold into place. Be VERY CAREFUL not to tug, pull or drag on the fabric as it passes under the needle.
What Else Can I Use It For?
~* Table Linens
~* Sashes and Ribbon edges
~* Scarves and Handkerchiefs
~* Pre-finishing raw fabric edges before laundering.
~* A tidy edge for ruffles!
I hope this how-to is useful for you.
Why am I Sewing Sequins?
Hello blog world! I believe an introduction is in order. My name is Angie. I'm 30 years old (gulp) and I have three kids.
What does that have to do with sequins, you ask? I have three kids who dance. (Ah ha!) I've been sewing since I was just nine years old, and now I work at our ballet school as one of two wardrobe mistresses/costume seamstresses. From hair and makeup, to alterations and backstage catastrophies, I've learned a lot of tips and tricks along the way.
Owing to the SAD lack of costuming information online, I've decided to SHARE my tips and tricks (and hopefully learn some too!). I hope you find this blog a useful resource in the future.